Pre-call UI Skeleton
To build a custom pre-call UI quickly, initially we need a participant auth token that allows host level permissions. This in turn needs a preset that allows us to enable/disable audio/video and lets us update the user name.
If you don't know how to create an auth token or have skipped (Setup Page)[/react-ui-kit/build-pre-call-ui/setup] entirely, now is the time to skim through it.
We recommend you to use group_call_host preset so that you don't end up facing issues that could easily have been avoided from start.
In case you don't have this preset, feel free to create a new one.
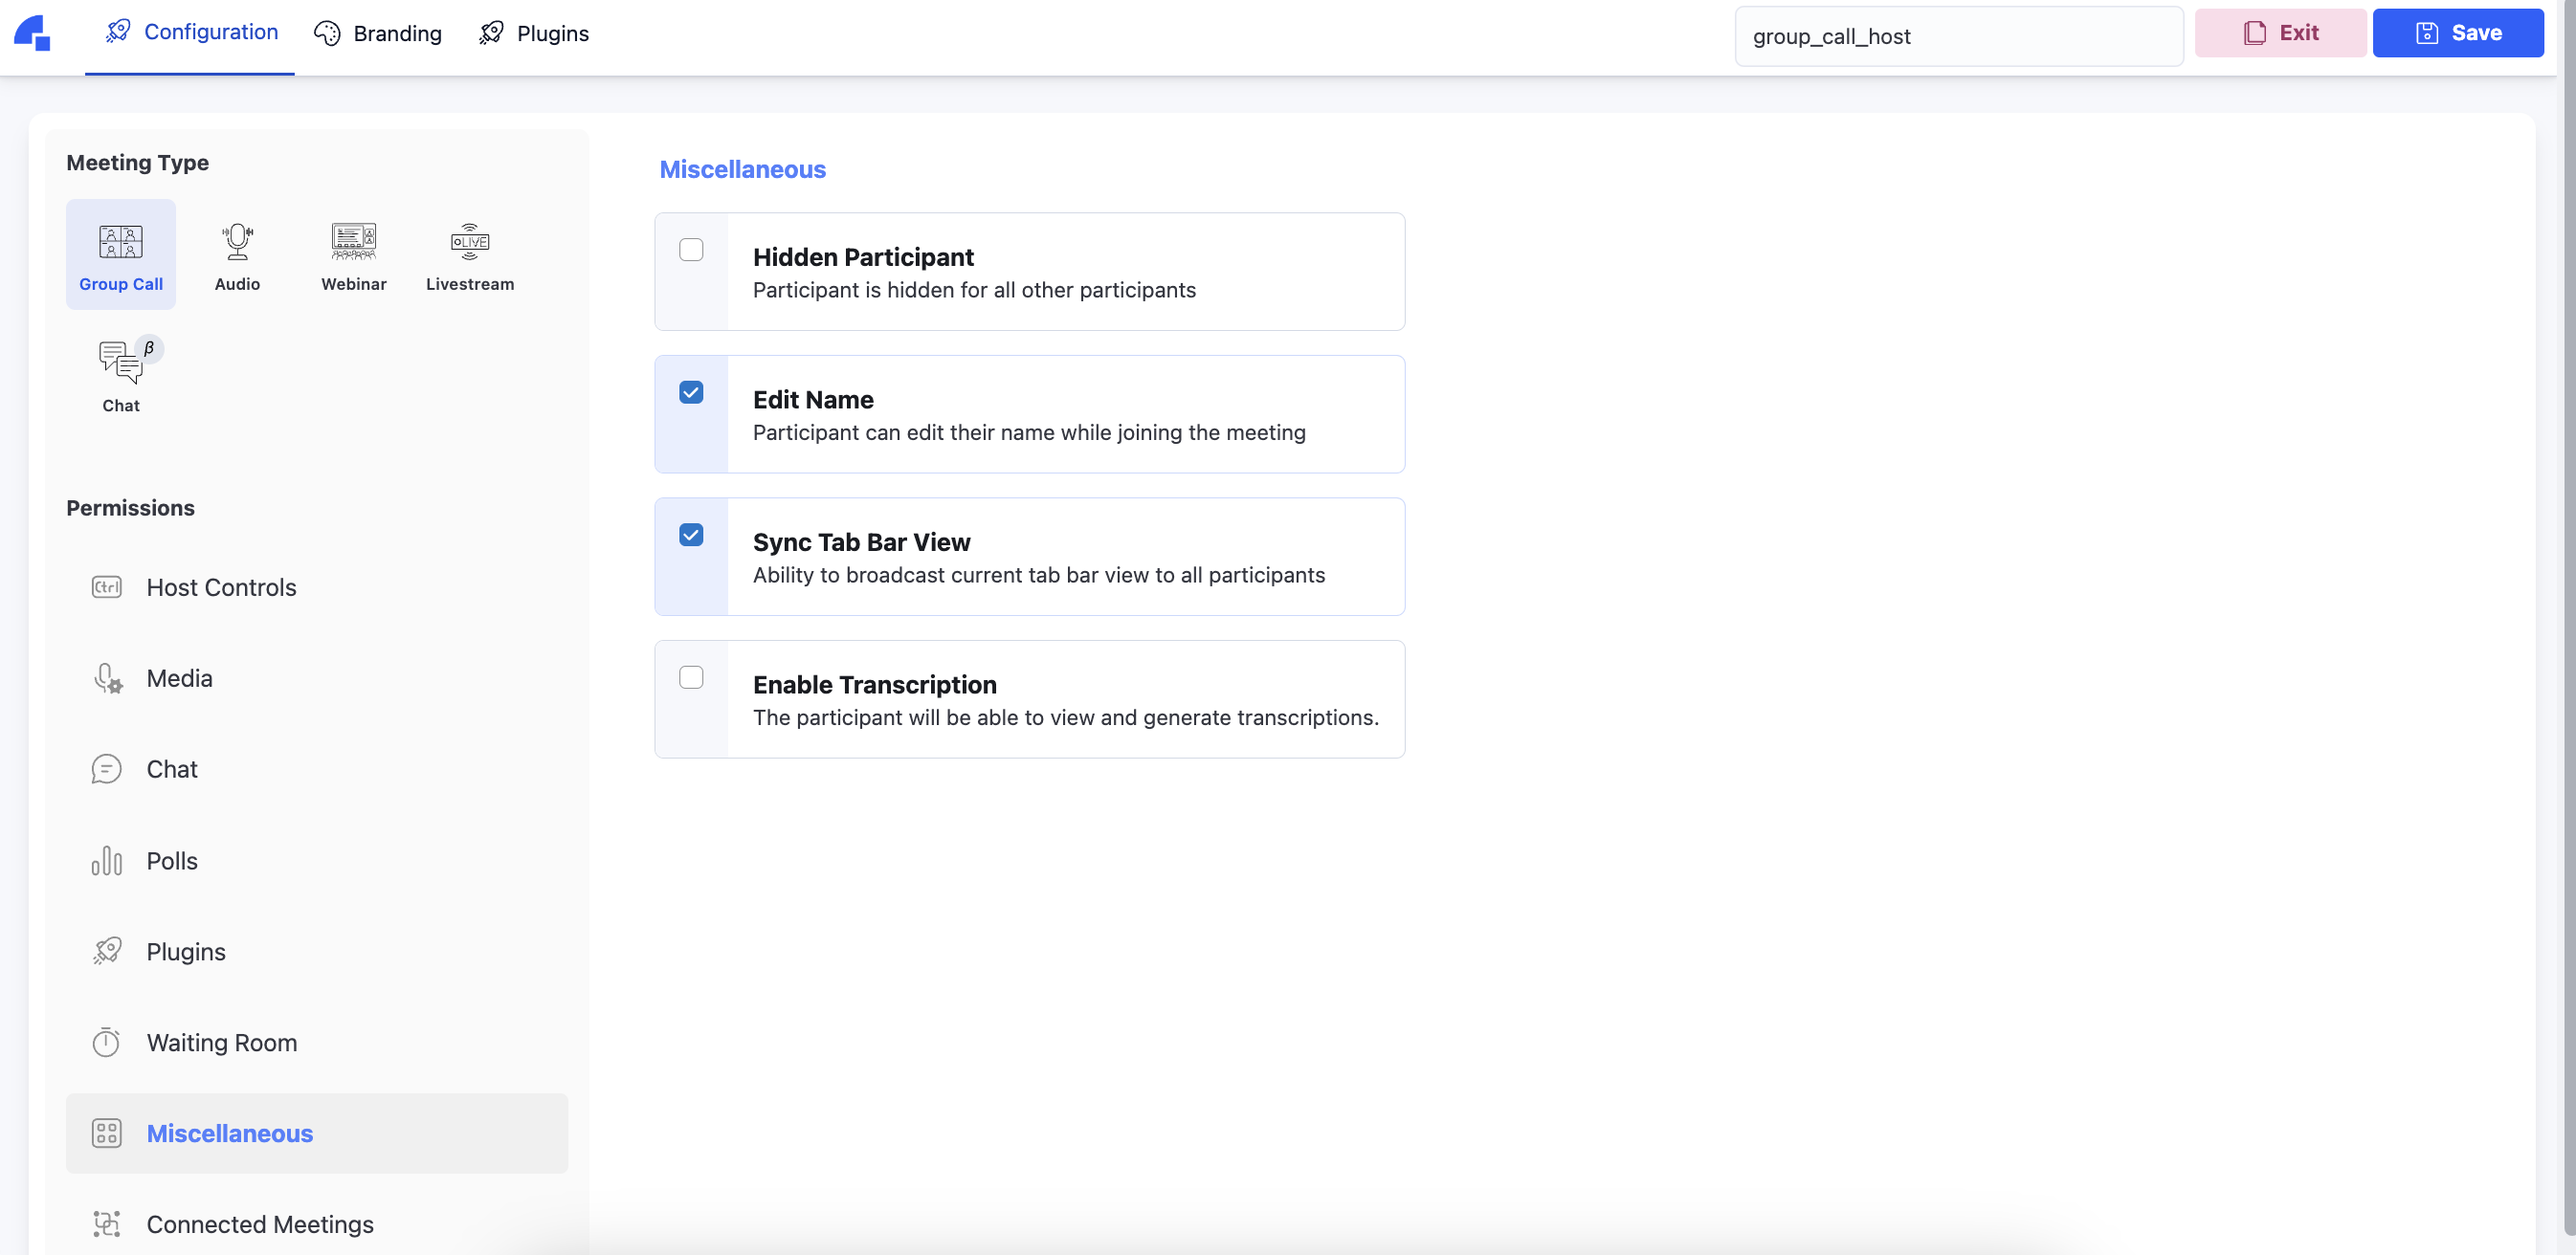
Make sure to enable the following permissions in the Preset Editor, for the preset, for a smooth tutorial walkthrough.
- Ensure
Meeting TypeisGroup Call. - Enable Video & Audio in
MediaTab. - Enable
Edit NameinMiscellaneousTab. - Enable
Accept RequestsinWaiting RoomTab. Set behavior asSkip - Enter Directly
Once you are comfortable building custom setup screen (pre-call UI) for Group Call meeting type, you can try adding waiting room, webinar, livestream pre-call UIs.
What are we building now?
We are deconstructing the default setup screen down to its atomic elements. This would give you a clear idea on customizability of Dyte components.
Let's put a skeleton in place.
There are 3 kinds of screens/pages that we will need to showcase a end to end working demo.
- Pre Call UI
- Meeting Stage (Actual meeting screen)
- Screen to show case that meeting is over
Let's start by putting basic code in the files without adding too much of Tailwind CSS or TypeScript.
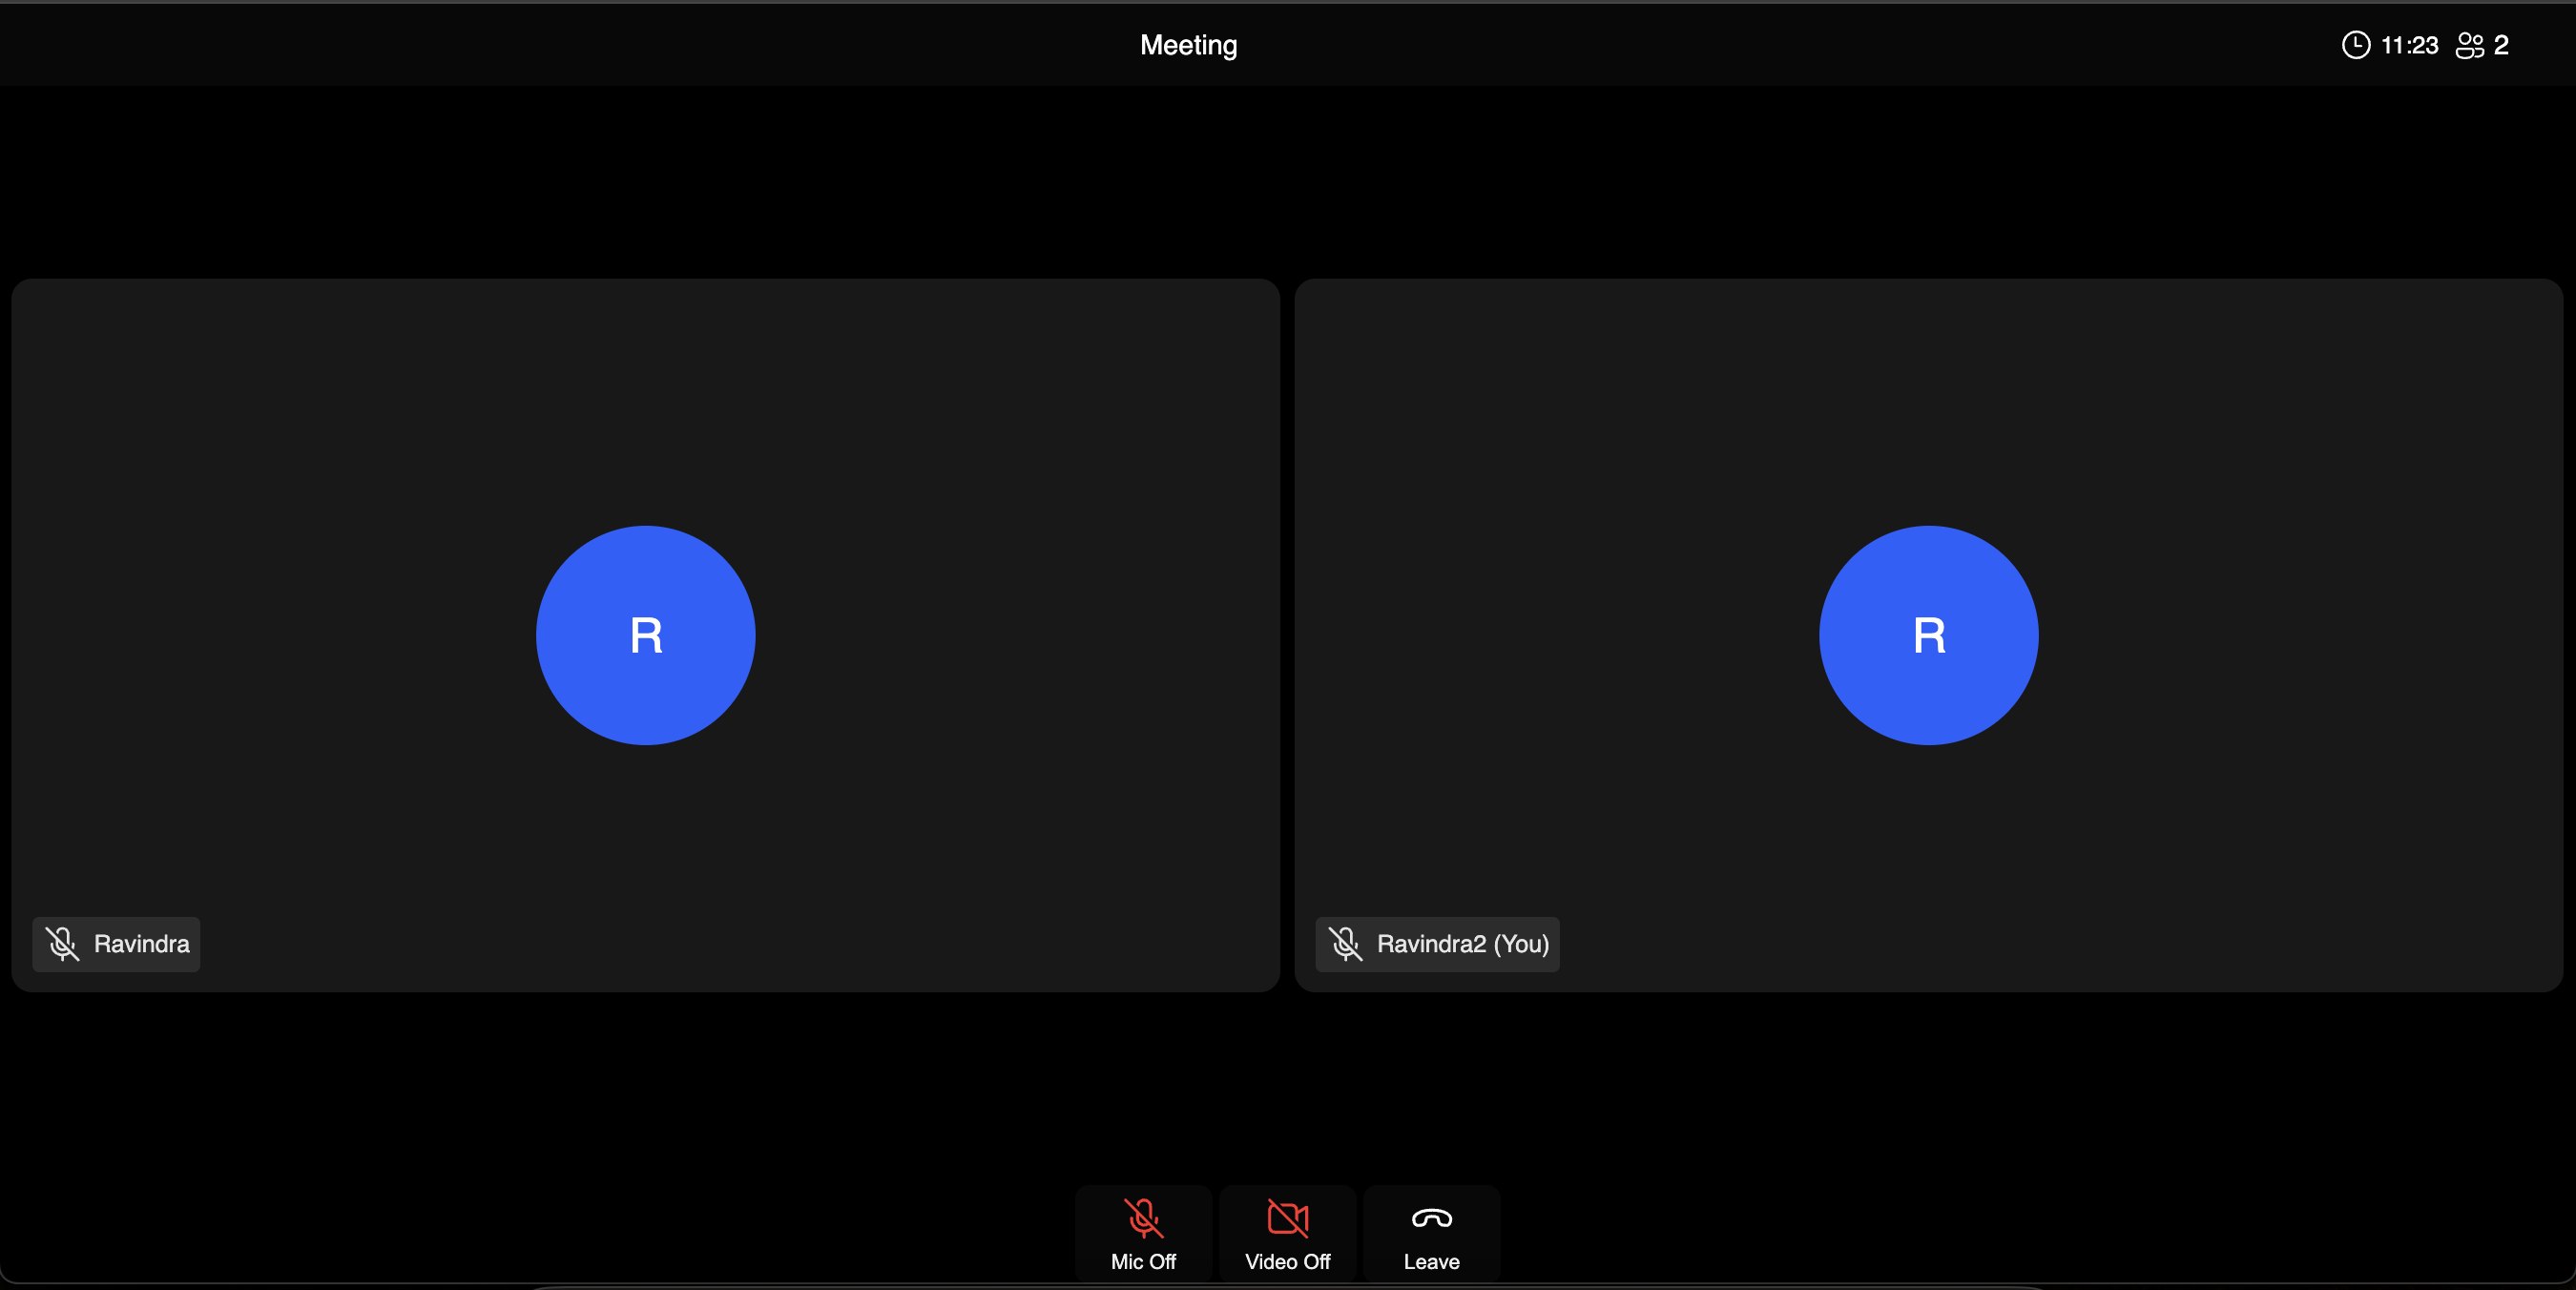
At the end of this tutorial page, we should have the following screens.


Code File: app/types.tsx
import type { States } from "@dytesdk/ui-kit";

export type CustomStates = States & { aRandomCustomState: boolean }

export type SetState = (newStates: Partial<CustomStates>) => void;
To keep Typescript happy, we need Types on useState and other such places. If you are using Typescript you can extend types such as states to serve your needs.
Code File: app/meeting-over.tsx
export default function MeetingOver() {
    return (
        <div key="left-meeting" className='w-full h-full flex justify-center items-center'>
            <div>You left the meeting</div>
        </div>
    )
}
This component will be rendered once peer (participant for the current session) leaves the meeting. Since we will be building the entire UI from scratch, we will know when peer leaves.
We can also figure out the peer leaving using the following listener.
meeting.self.on('roomLeft', ({ state }) => {
  // state is a string whose values are explained below
  if (state === 'left') {
    console.log('User has left the meeting');
  }
});
Similarly we can listen to roomJoined as well. To know more, please refer to Local User Events. Since React Web Core is a wrapper on top of JS web-core, these methods will work for React as well as plain JS.
Code File: app/meeting-stage.tsx
import { DyteHeader, DyteSimpleGrid, DyteMicToggle, DyteCameraToggle, DyteLeaveButton } from "@dytesdk/react-ui-kit";
import { useDyteSelector } from "@dytesdk/react-web-core";
import type DyteClient from "@dytesdk/web-core";
import { CustomStates } from "./types";

export default function MeetingStage({
    meeting, states
}: { meeting: DyteClient, states: CustomStates }) {
    const activeParticipants = useDyteSelector(
        (meeting) => meeting.participants.active
    );
    return (
        <div key="in-meeting" className='flex flex-col w-full h-full'>
            <DyteHeader meeting={meeting} className='flex justify-between' />
            <div className='flex h-full'>
                <DyteSimpleGrid meeting={meeting} participants={[...activeParticipants.toArray(), meeting.self]} states={states} />
            </div>
            <div className='flex justify-center'>
                <DyteMicToggle meeting={meeting} />
                <DyteCameraToggle meeting={meeting} />
                <DyteLeaveButton />
            </div>
        </div>
    )
}
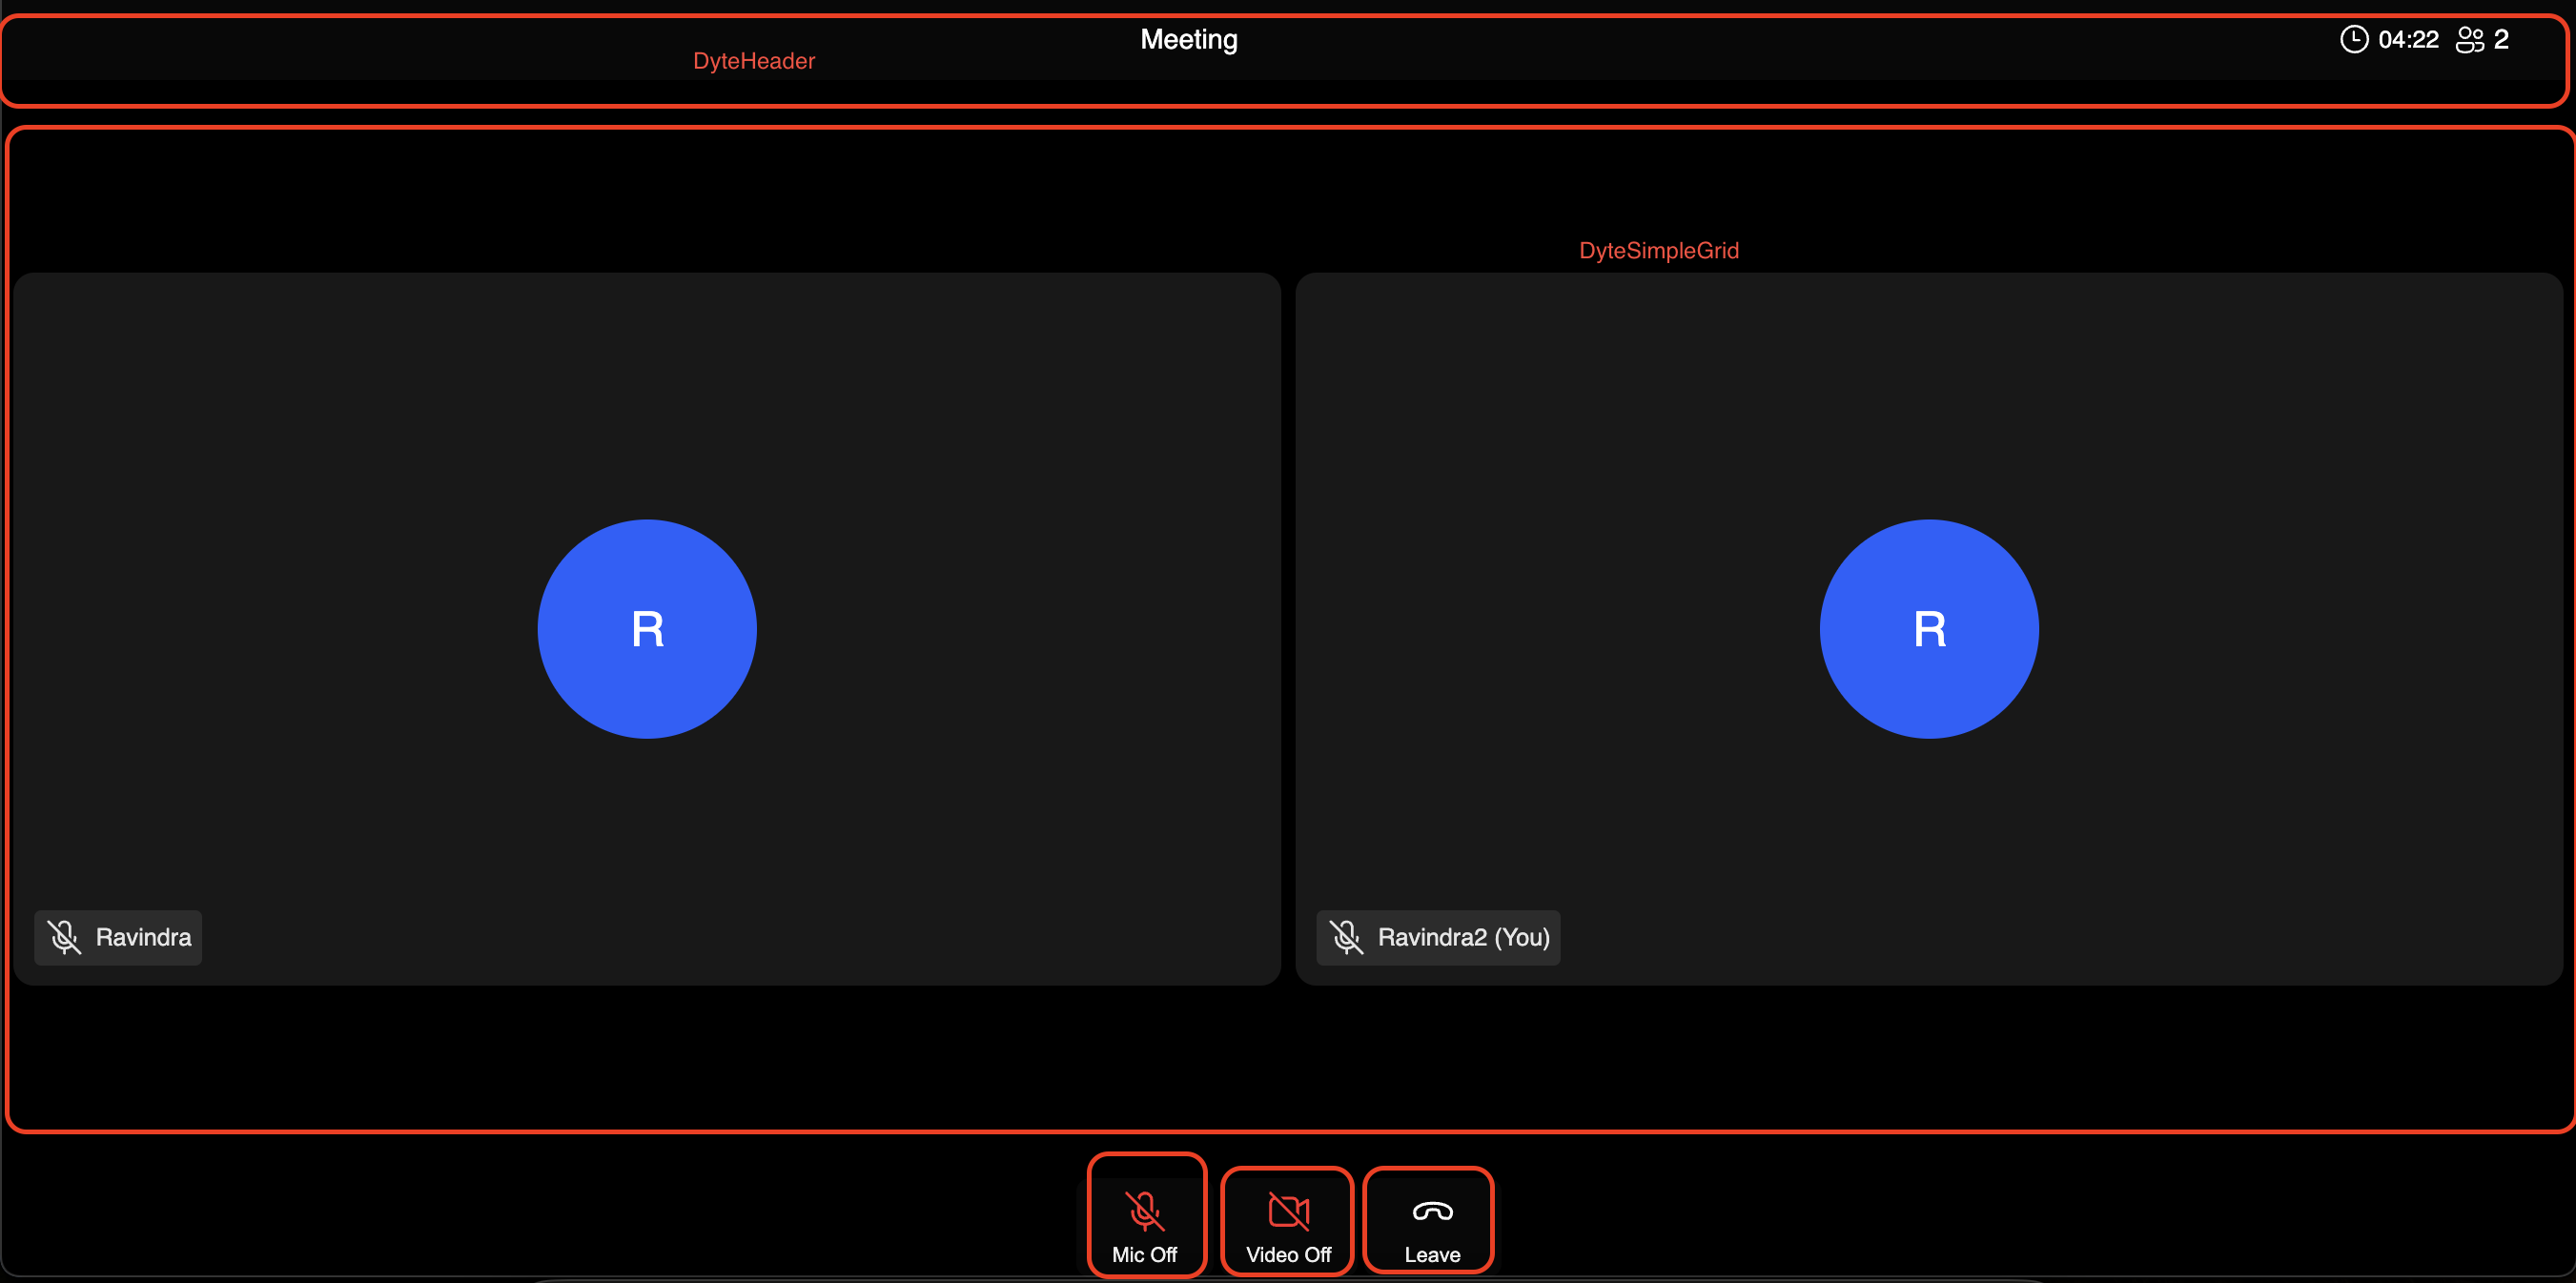
We have created meeting-stage.tsx just to showcase that the Dyte meetings can be integrated even without the DyteMeeting component. Since our main focus is to build pre-call UI, we will not be venturing deep into meeting stage UI.
Therefore to keep everything simple, we have not added functionalities such as Chat, Polls, Recording, Screenshare here.
We will create a separate guide for that. For now, just to have a quick walkthrough, let's see the usage of the Dyte elements that were used here.
DyteHeader component renders the Header containing meeting name, logo, timer and various other things.
DyteSimpleGrid component is rendering all the participants that are on active for the current page, including self.
DyteMicToggle lets you toggle microphone.
DyteCameraToggle lets you have toggle camera.
DyteLeaveButton lets you leave the meeting. If you have the Kick permission, you can end meeting for everyone as well.
DyteLeaveButton can show a dialog popup, a modal, to give you the option to just leave yourself or to kick all. For this, it requires DyteDialogManager component to be present in the DOM to function properly. We will be adding DyteDialogManager in a common place in app/page.tsx since a lot of functionalities depend on it.
Code File: app/meeting-precall-ui.tsx
import { DyteSetupScreen } from "@dytesdk/react-ui-kit";
import type DyteClient from "@dytesdk/web-core";
import { useEffect, useState } from "react";
import { CustomStates, SetState } from "./types";

export default function PrecallUI({
    meeting, states, setState
}: { meeting: DyteClient, states: CustomStates, setState: SetState }
) {
    const [participantName, setParticipantName] = useState('');

    useEffect(() => {
        if (!meeting) {
            return;
        }
        setParticipantName(meeting.self.name);
    }, [meeting])

    return (
        <div key="on-setup-screen" className='flex justify-around w-full h-full p-[10%]'>
            <div className='flex justify-around w-full h-full p-[10%]'>
                <DyteSetupScreen meeting={meeting} />
            </div >
        </div >
    )
}
Currently this file uses DyteSetupScreen which is default setup screen. However our task is to divide it further into smaller pieces till the point where each and everything is customizable.
Code File: app/page.tsx
"use client";

import { useEffect, useState } from 'react';
import {
  DyteDialogManager,
  DyteNotifications,
  DyteParticipantsAudio,
} from '@dytesdk/react-ui-kit';
import { DyteProvider, useDyteClient } from '@dytesdk/react-web-core';
import MeetingOver from './meeting-over';
import MeetingStage from './meeting-stage';
import PrecallUI from './meeting-precall-ui';
import { CustomStates, SetState } from './types';

export default function DyteCustomSetupScreen() {
  const [meeting, initMeeting] = useDyteClient();
  const [participantState, setParticipantState] = useState<'initializing' | 'on-setup-screen' | 'in-meeting' | 'left-meeting'>('initializing');

  const [states, setStates] = useState<CustomStates>({
    aRandomCustomState: false,
  });
  const setState: SetState = (newStates) => setStates((states) => ({ ...states, ...newStates }));

  useEffect(() => {
    const searchParams = new URL(window.location.href).searchParams;

    const authToken = searchParams.get('authToken');

    if (!authToken) {
      alert(
        "An authToken wasn't passed, please pass an authToken in the URL query to join a meeting."
      );
      return;
    }

    initMeeting({
      authToken,
    });
  }, []);

  useEffect(() => {
    (window as any).meeting = meeting;
    if (meeting) {
      setParticipantState('on-setup-screen');
      meeting.self.addListener('roomJoined', () => {
        setParticipantState('in-meeting');
      });
      meeting.self.addListener('roomLeft', () => {
        setParticipantState('left-meeting');
      });

      // add event listener to state updates of Dyte elements
      document.getElementById('dyte-integration-wrapper')?.addEventListener('dyteStateUpdate', (e: any) => {
        setState(e.detail);
      });
    }
  }, [meeting])

  if (!meeting) {
    return;
  }
  return (
    <DyteProvider value={meeting}>
      <div className='flex h-screen w-screen' id='dyte-integration-wrapper'>
        {
          (participantState === 'initializing' && (
            <div key="initializing" className='w-full h-full flex justify-center items-center'>
              <div>Initializing Dyte meeting...</div>
            </div>
          ))
        }
        {
          (participantState === 'on-setup-screen' && (
            <PrecallUI meeting={meeting} states={states} setState={setState} />
          ))
        }
        {
          (participantState === 'in-meeting' && (
            <MeetingStage meeting={meeting} states={states} />
          ))
        }
        {
          (participantState === 'left-meeting' && (
            <MeetingOver />
          ))
        }
        <DyteParticipantsAudio meeting={meeting} />
        <DyteNotifications meeting={meeting} />
        <DyteDialogManager meeting={meeting} />
      </div>
    </DyteProvider>
  );
}
Finally the binding code that shows the desired view as per the participant's current state. In this component, we are listening to meeting.self's roomJoined and roomLeft events to update view in React as per the participant state.
<DyteParticipantsAudio meeting={meeting} />
<DyteNotifications meeting={meeting} />
<DyteDialogManager meeting={meeting} />
These 3 components are needed to ensure that you can hear the participant audio, see notifications and act on popups for cases such as Leave meeting.
In case you are not able to join the meeting despite having correct auth token, try reloading the page.
// add event listener to state updates of Dyte elements
document.getElementById('dyte-integration-wrapper')?.addEventListener('dyteStateUpdate', (e: any) => {
    setState(e.detail);
});
Most of the Dyte components emit dyteStateUpdate event to send data or to request showing some view in the modal, on actions such as button click, to the DyteDialogManager and vice versa. This helps to ensure that the state across Dyte are updated in real time.
Since these events bubble, these can be listened on the parent components of any Dyte component. This will help you work with DyteDialogManager using a protocol that Dyte follows internally.
In case you don't want Dyte's Dialog Manager, and want to build your own, dyteStateUpdate is the way to go.
How to run this?
If you have saved all these files properly, next step would be to test it out.
Run the following command.
npm run dev
Check the URL that this command gives.
If it is localhost:3000, to run a Dyte meeting, you can use http://localhost:3000/?authToken=PUT_A_VALID_PARTICIPANT_AUTH_TOKEN_HERE.
If you are able to see the Setup Screen and then able to join the meeting, it seems that everything we did so far worked.
Try opening 2 such URLS in 2 tabs and try enabling audio/video and check if you are able to hear & see the other participant.
If you are facing issues, try reloading. If still it doesn't work, please contact Dyte support.
Next we will be discussing how we can replace DyteSetupScreen component with our custom implementation.